At #SearchLove in Boston this year we heard Amanda from Seer Interactive talk about Site Search and how to use your own site as a mini-Google. That’s really smart stuff, I thought – acquiring users is half the battle – the other half is keeping them there and getting them to do things.
It’s easy to say, “Oh yeah, we’ve got a search box in the navigation bar, it’s also on our 404 page, we’re good to go.” It’s also easy to set it up in Google Analytics and use the built-in site search functionality to see what people are searching for. But what really stood out to me was how GA doesn’t distinguish between site searches that return results and site searches that don’t.
What’s the difference? Well, a user that finds a result (hopefully) clicks through to the page they want and continues on to buy ALL THE THINGS. A user that doesn’t, likely bounces out, possibly never to be seen again (like that tube of Chapstick you lost between your driver’s seat and the center console).
So let’s track those “No Results” queries and use that data to do something about it. How do you track them? Google Tag Manager is one way to do it (and as far as this blog post is concerned, the ONLY way to do it). I’m going to walk you through the steps to set up Tag Manager to track on-site search results that return no results.
In the interest of full disclosure, Helen Overland at Search Engine People already wrote up this procedure back in January. I borrowed A LOT of her research on how to do this. Since then however, Tag Manager has changed and if you follow those instructions verbatim, you may be confused or even lost by the new Tag Manager v2 interface (all new Tag Manager accounts created after 5/20/15 are now forced into v2. Older accounts using v1 can opt-in to v2 and migrate over).
So again, a tip of the hat to Helen for publishing the groundwork for these instructions. There are some key changes in v2 to be aware of, and I’ll walk you through all of those.
Understand the What & Why
What we’re going to do is set up Tag Manager so when site searches return no results, those particular keywords are logged as an Event in Google Analytics (Behavior > Events). The Event keywords will be located separately from the site search keywords and while you won’t get the same exact data fields, you can export the list, compare it to GA’s built-in site search results, find the matching values and retain all the data.
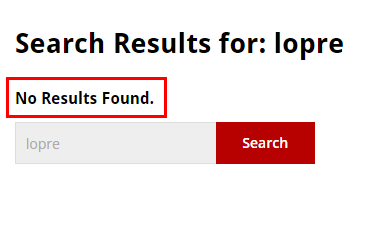
To do this, we’re going to look at the site search results page and find a particular characteristic that indicates there are no results. This is generally a piece of text that says, “No Results Found” or something similar. The point is that it can only show up on the results page when there are no results.
We’re going to tell Tag Manager, “When this piece of text displays on this page, it means there are no results and you should log the query into GA.” Sounds simple on paper but the implementation is where it gets more technical – there’s a lot of customization required.
The Tag Manager Setup Process
In Tag Manager, you’re going to need to set up 2 Tags, 2 Triggers and 4 Variables. We’ll start by creating the Variables – they’re the easiest and the foundation of the Triggers and Tags. Creating the Triggers and Tags will require the Variables to already exist. Next we’ll work on Triggers and then finally we’ll create the Tags, one of which will contain the main code that ties all these pieces of the puzzle together.
Variables
Setting up Variables will generate pieces of data used throughout the process. I’ll elaborate on what each specific Variable does as we create them.
Variable #0: GA Tracking Code
This variable isn’t technically necessary for this process, which is why I call it Variable 0. However, it will make your life easier (check to see that you haven’t created one of these already). Tag Manager requires you to use your Google Analytics UA code A LOT. Rather than log into GA all the time to get it, we’ll set it up as a constant variable in Tag Manager, so that you can pull it up whenever you need it.
I called my Variable, “GA Tracking Code” but you can call it whatever you want.
Image may be NSFW.Clik here to view.
- Choose Type: Constant
- Configure Variable Value: [YOUR UA CODE]
- Save Variable
Now you can call up this Variable whenever your UA code is needed.
Variable #1: gaEventAction
Image may be NSFW.Clik here to view.
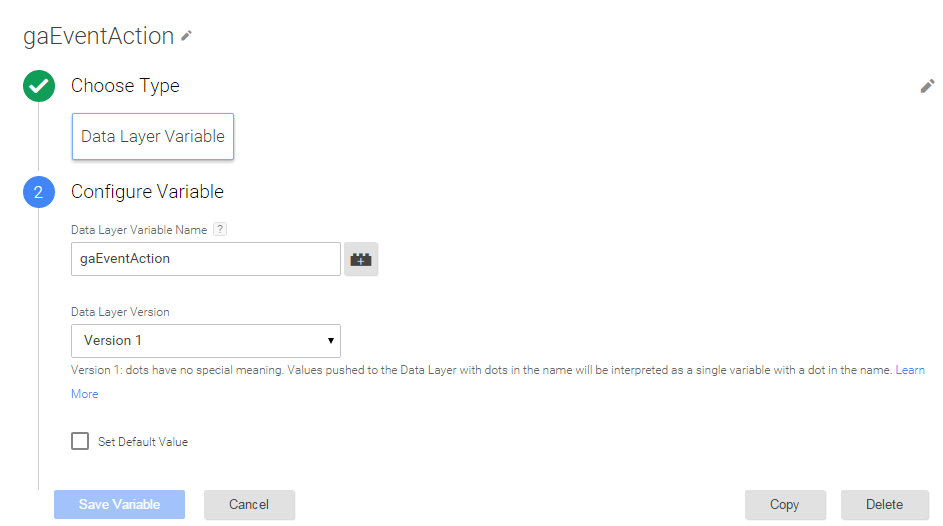
- Choose Type: Data Layer Variable
- Configure Variable:
- Data Layer Variable Name: gaEventAction
- Data Layer Version: Version 1
- Save Variable
Variable #2: gaEventCategory
Image may be NSFW.Clik here to view.
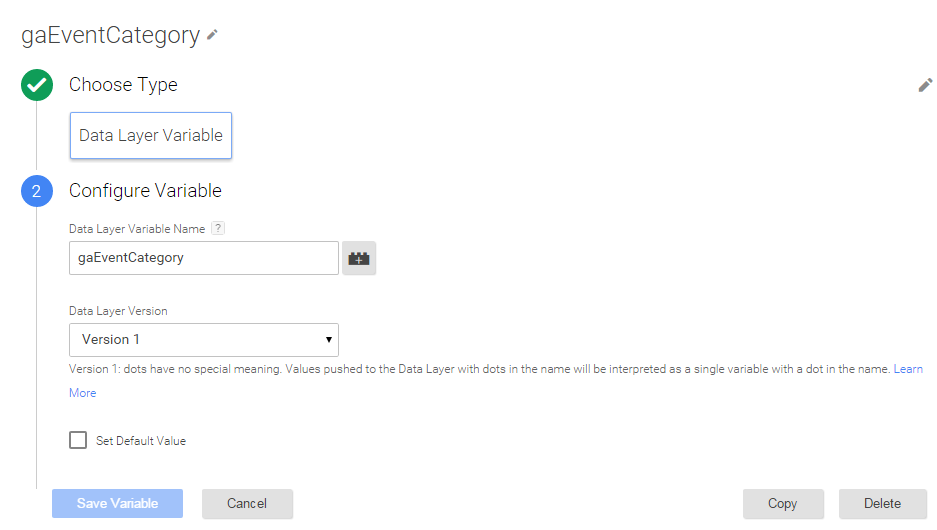
- Choose Type: Data Layer Variable
- Configure Variable:
- Data Layer Variable Name: gaEventCategory
- Data Layer Version: Version 1
- Save Variable
Variable #3: ResultsPageTitle
Image may be NSFW.Clik here to view.
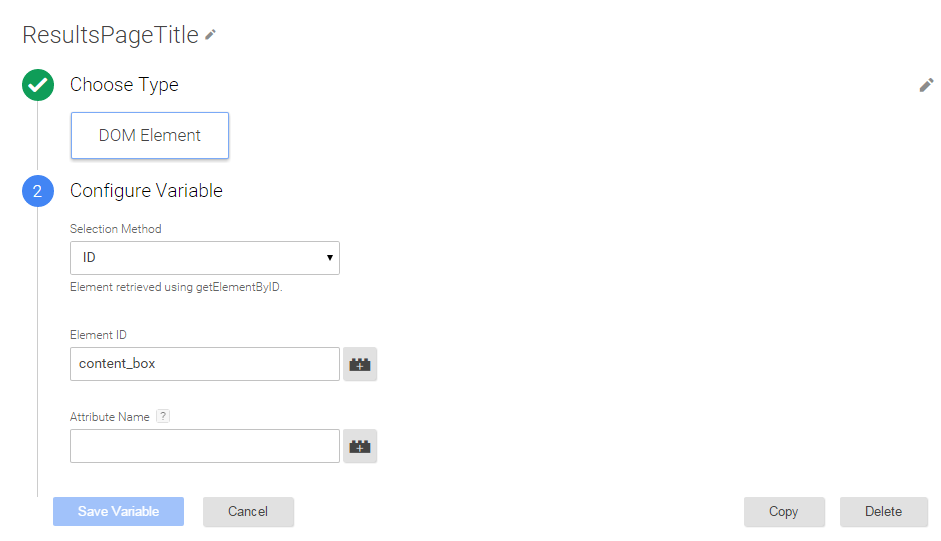
This is how you identify a characteristic of your search results page. You need an element ID that contains the relevant text.
- Choose Type: DOM Element
- Selection Method: ID
- Element ID: content_box
- WARNING: content_box is what works for this example, and your site is probably different. See screenshot. The Search Results text appears within this div ID. This identifies an area in which our Tag will look for a specific identifier that indicates no results were found.
Clik here to view.
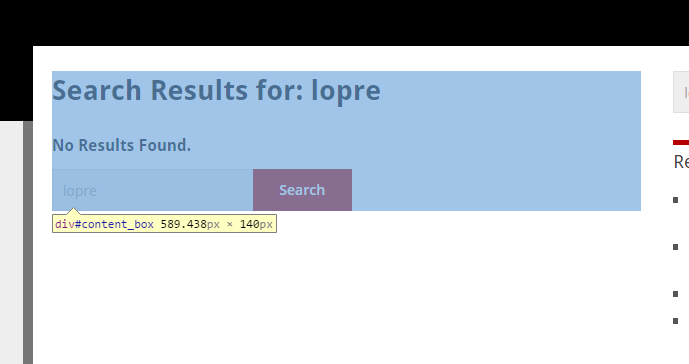
The blue highlighted section is the div created by the Id “content_box”
Clik here to view.
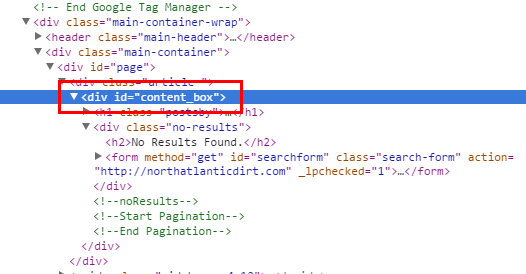
Digging through the page source reveals the div id that contains the “No Results Found.” text, shown two lines below.
Variable #4: URLQueryText
This Variable will end up logging the actual keyword used for the search.
Image may be NSFW.Clik here to view.
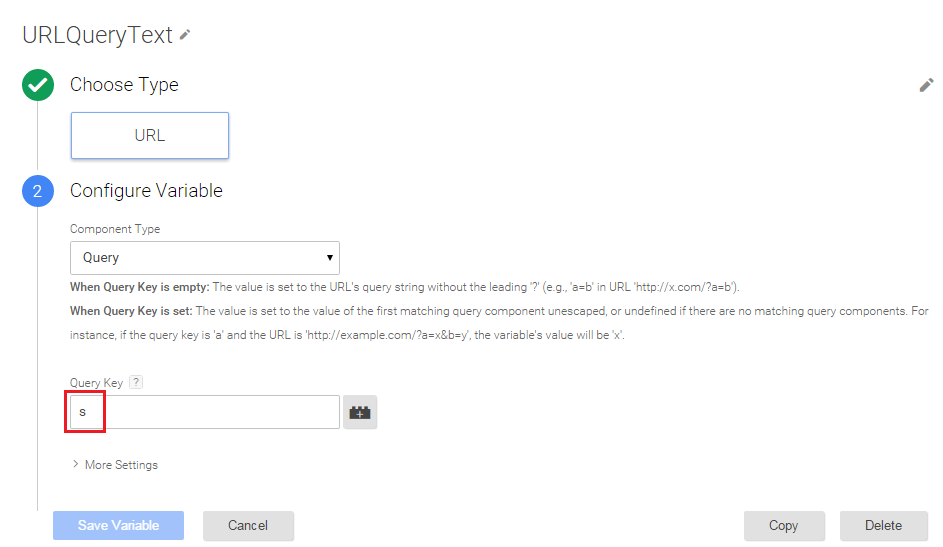
- Choose Type: URL
- Component Type: Query
- Query Key: s
Clik here to view.
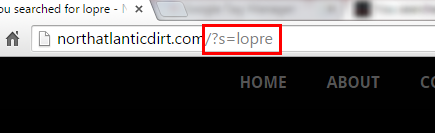
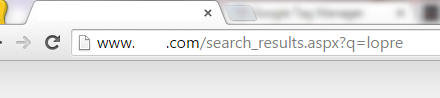
In this URL, the ‘s’ query parameter appears immediately after the trailing slash on the homepage.
- Site searches generally have a parameter attached, commonly “s” or “q.” This parameter will appear in the URL and if you’ve already set it up in GA, it’s the same one you used there. Whatever your parameter is, enter it in the Query Key box.
- Save Variable.
Triggers
Trigger #1: gaEventTrigger
This Trigger is going to say, “When the code says an event is in play, log the data from the event.”
Image may be NSFW.Clik here to view.
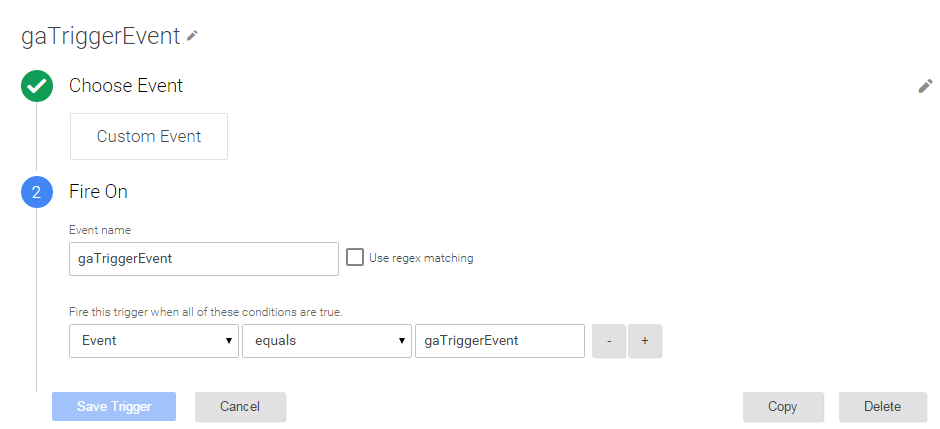
- Choose Event: “Custom Event”
- Fire On
- Event Name: Call this “gaTriggerEvent”
- Pick rules indicating when to fire this Trigger: When “Event equals gaTriggerEvent”
- Save Trigger
Trigger #2: SearchPagesOnly
Image may be NSFW.Clik here to view.
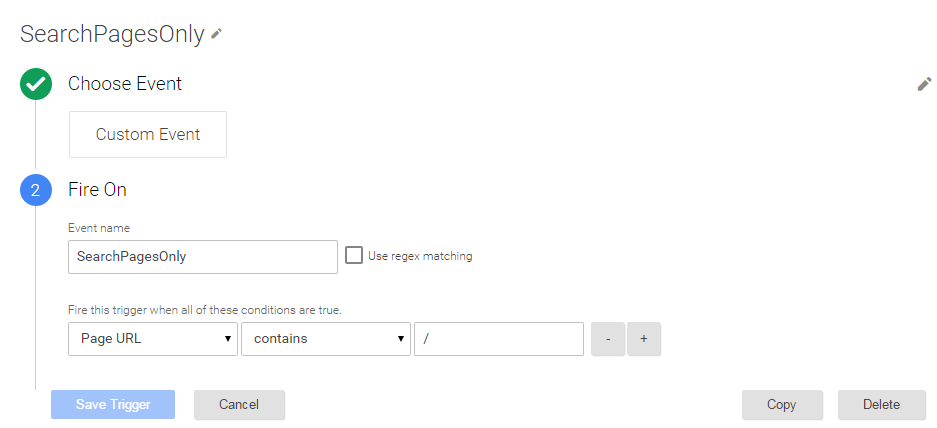
- Choose Event: “Custom Event”
- Fire On
- Event name: SearchPagesOnly
- Pick rules indicating when to fire this Trigger: “Page URL contains /” In this case, “/” is going to be whatever the page is where search results appear. In this case, it’s the homepage with parameters attached to it.
- Look at the URL on your search results page. The section between the domain name and the search parameters is the page to include here. In this other example, search_results.aspx is the text to enter.
Clik here to view.
- Save Trigger
Tags
Tag #1: the main No Results Tag
This is the main tag that makes all the magic happen. I’ll explain how it works below the numbered steps.
Create a tag and name it whatever you want. I called mine, “NoSearchResults.”
Image may be NSFW.Clik here to view.
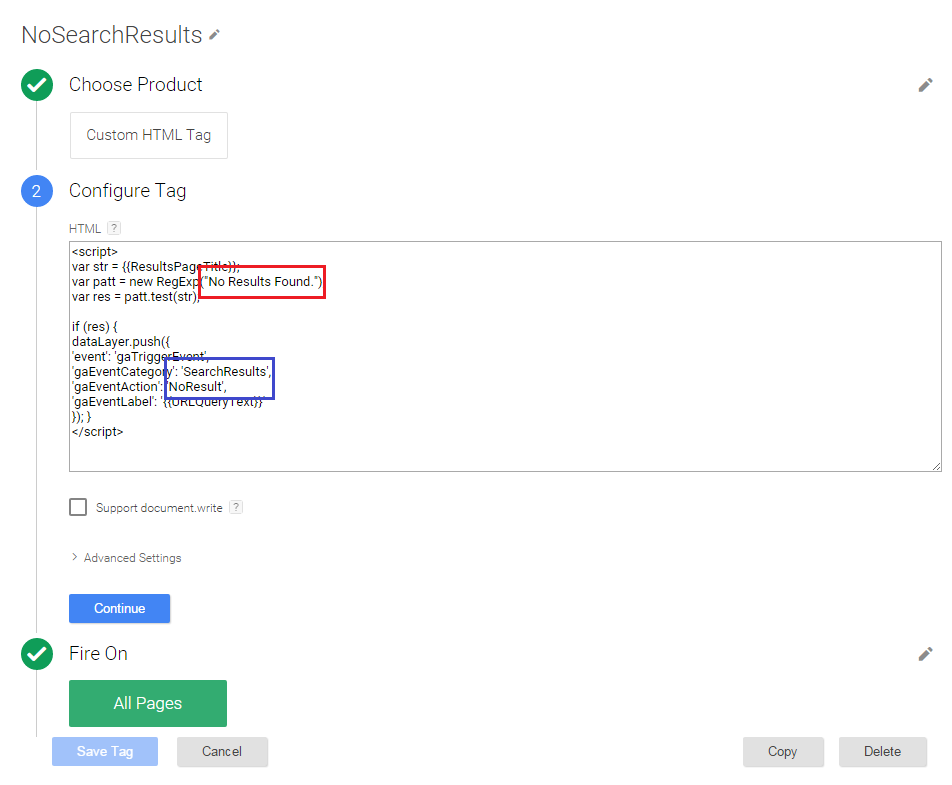
- Choose Custom HTML as the Product.
- Configure the Tag with the following code:
<script>
var str = {{ResultsPageTitle}};
var patt = new RegExp("No Results Found.");
var res = patt.test(str);
if (res) {
    dataLayer.push({
        'event': 'gaTriggerEvent',
        'gaEventCategory': 'SearchResults',
        'gaEventAction': 'NoResult',
        'gaEventLabel': '{{URLQueryText}}'
    });
}
</script>
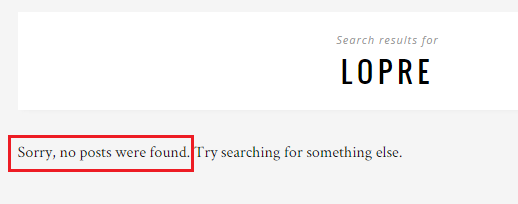
You can change the “SearchResults” and “NoResults” text in the blue box to read whatever you want. The “No Results Found” text in the red box will NEED to be changed to whatever text appears when no results are returned by a search – it varies from site to site. Another example is pictured in the screenshot below. In this example, the text reads “Sorry, no posts were found.” Confused? I don’t blame you. The next paragraph will explain how the code works.
Image may be NSFW.Clik here to view.
- Select All Pages for the Fire On option.
- Save the Tag.
How the Code Works
Image may be NSFW.Clik here to view.

Line 1 indicates that the Custom HTML will be Javascript code, with the opening <script> tag.
In Line 2: The {{ResultsPageTitle}} Variable (Variable #3) we coded before looks in a section of the site (with the specified div ID) and produces the line of text that your website displays on the page when a search is performed. In this example, it displays “Search results for: [KEYWORD]” followed by either A) relevant pages & posts or B) “No Results Found.”
Image may be NSFW.Clik here to view.
The 3rd line of code identifies the unique phrase that indicates no results. As noted previously, in this example it is “No Results Found.” You will need to find out what your site displays and change that text to match your site.
The 4th line of code instructs the Tag to scan the page text produced by Line 2 of the code, for the “No Results Found” identifier specified by Line 3 in the code. If the search yields no results, the Tag will encounter the “No Results Found” phrase and produce a positive response (you’ll never see this positive response anywhere, so don’t worry about it. In fact, much like a site that appears on the 5th or 6th page of Google’s search results, we’ll ignore it completely).
The 6th line of code starts a conditional statement that says, “If the 4th line of code produces a positive output, execute the following actions.” In other words, if there are no search results, here’s what will happen.
Line 7 indicates we’re going to push a dataLayer and the first half of line 8 specifies that it’s going to be an event. The second half of line 8 refers to the gaEventTrigger (Trigger #1) we created earlier that forces the event to occur.
Lines 9 through 11 specify the parameters that the Event will have when it reports in Google Analytics: Event Category (Variable #2), Event Action (Variable #1) and Event Label. GA requires you to have Category and Action enabled but you technically don’t need to include Label – it’s an optional field. If you want to kill it off, replace “NoResult” in line 10 with the {{URLQueryText}} Variable from the line 11 and then delete line 11 altogether.
What this code says is: Assuming there are no search results and the first three lines of code return a positive result, we’ll log an event occurrence in GA under the SearchResults Category, NoResult Action and the Label {{URLQueryText}} will appear as the search query. {{URLQueryText}} is Variable #4 that we already set up (the actual keyword). Note that you can change “SearchResults” and “NoResult” to whatever you want to appear in GA reporting. It won’t affect functionality at all.
Tag #2: GA Event Trigger
Image may be NSFW.Clik here to view.
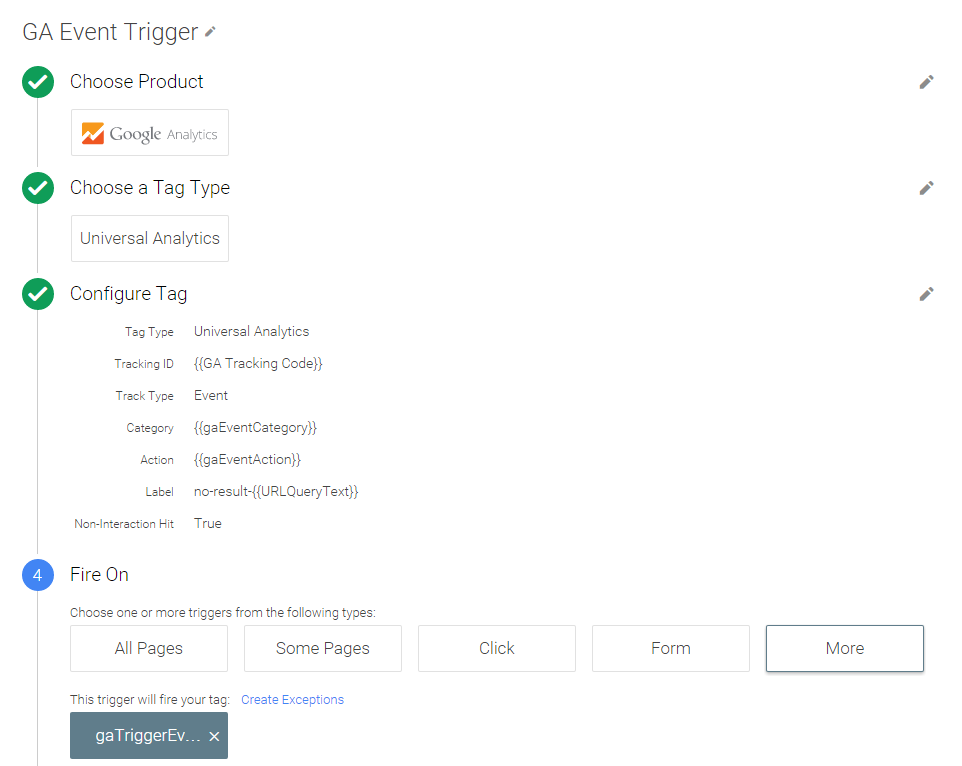
- Choose Google Analytics as the Product.
- Pick Universal Analytics (you are using Universal Analytics, right?)
- Configure the Tag as follows:
- Tracking ID: Enter your GA Tracking ID here (UA code). If you followed my earlier steps under Variable 0, you can use the Variable you set up explicitly for this purpose.
- Track Type: Event
- Category: Pick the {{gaEventCategory}} Variable you set up previously.
- Action: Pick the {{gaEventAction}} Variable we set up previously.
- Label: Pick the {{URLQueryText}} Variable we set up previously. You can add something before or after it. I chose “no-result-” This string will show up as the keyword in GA Event tracking.
- Value: Leave this blank
- Non-Interaction Hit: Pick “True”
- Fire On: Pick the gaEventTrigger Trigger we set up previously.
- Save Variable.
And that’s it for setup. Now, you can test. Navigate to the site you set this up for and search for a few queries that you know won’t return anything. Jargon and gobbledygook are perfect for this – I’ve been using a sequence of letters that spells out “lopre.”
If you’re impatient or excited (like me), log into Google Analytics, select Real-Time > Events from the sidebar menu, and click “Events (Last 30 min).” If your implementation is correct, you’ll see it pop up with the Category and Action that you specified.
Long-term, you can select Behavior > Events and see all the data you’ve been logging. Remember that this data does not populate in real-time and often (much like conversions) takes hours to fully populate (hence why I like real-time for testing).
Next Steps
You’ve gone to all this trouble, now what the devil are you going to do with the data you’ve collected? Stay tuned, because we’ll have another blog post coming that talks about the next steps. In the meantime, tweet @DragonSearch or @BerkleyBikes or leave your questions or comments below.